Calibrating Your RazorGage
Automatic Saw Measuring System


RazorGage is a leader in automatic positioners and saw systems. Our automatic saw measuring systems, programmable saw stops and optimizing saw systems provide the best in efficiency and cutting accuracy. Each RazorGage product is built for precision with the purpose to enhance your processes and transform your operation. Our products use top-of-the-line hardware, intelligent design and powerful optimizing saw software to ensure your cuts are precise, maximizing productivity while minimizing overall waste.

When you purchase your RazorGage saw system, the first step to ensuring accuracy in your operation is to calibrate your machine. However, we often receive questions from customers about how to calibrate the RazorGage. In just a few simple steps your machine can be up and running. Follow along with the steps and a short demonstration video below.

How to

CALIBRATE YOUR RG3 RAZORGAGE

How to

CALIBRATE YOUR ST RAZORGAGE

RG3 - RGST Calibration Procedure

Diagram highlighting the Stop Extension
Click to enlarge
The first step in calibration is to set the STOP EXTENSION. Home the RazorGage positioner and adjust the stop extension to the appropriate distance from the blade.

If you are using the RazorGage as a STOP ONLY

Adjust the STOP EXTENSION only close enough to cut the SHORTEST finished part you ever intend to cut. For example, if you’ll never cut a part shorter than 4”, set the stop 3.5” away from the saw.

If you are using the RazorGage as a PUSHER but it is NOT a RazorGage RazorOptimal or APS.

Adjust the STOP EXTENSION about 1/2” outside any clamps that might clamp the stop extension when the pusher positions the materisl for the last few cuts. You don’t want the pusher crashing into the clamps during homing and you don’t want the clamps to clamp the pusher during the last few cuts.

If you are setting the stop extension on a RazorOptimal

Adjust the STOP EXTENSION so that it is about 1/4” away from the TOP CLAMP. You don’t want the top clamp to come down on the pusher when the saw is making the final cut. You don’t have to worry about the FRONT CLAMPS clamping the pusher on a RazorOptimal.

If you are setting the stop extension on a RazorGage APS

If your material is EVER thinner than the STOP EXTENSION, adjust the STOP EXTENSION so that it is about 1/4” away from the TOP CLAMP. If your material is ALWAYS thicker than the top clamp you can adjust it so that is comes right up to the blade.You don’t have to worry about the FRONT CLAMPS clamping the pusher on an APS.

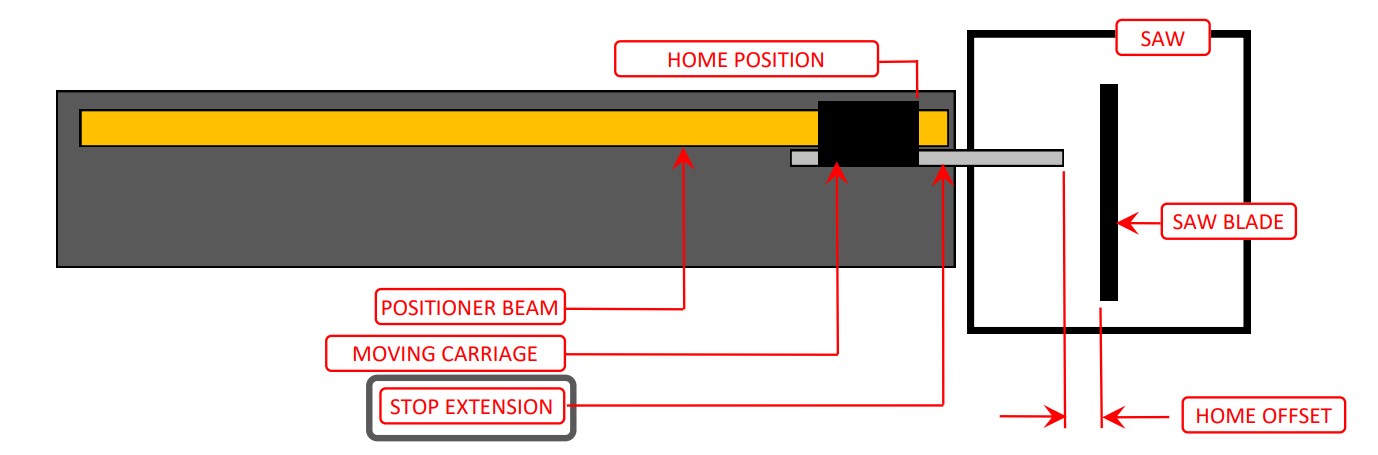
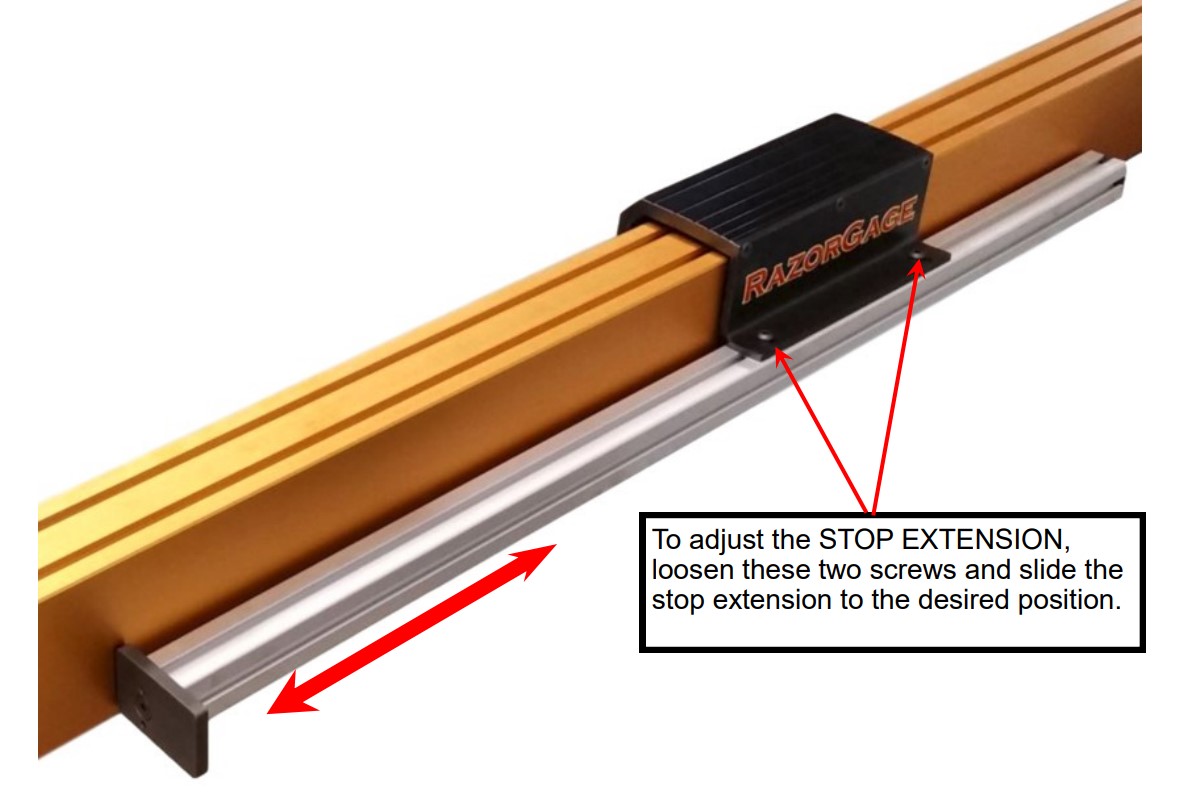
Adjusting the Stop Extension

To adjust the STOP EXtension, loosen these two screws and slide the stop extension to the desired position
Click to enlarge
Do not proceed to the next step of setting the HOME OFFSET until you are satisfied with the location of the STOP EXTENSION. If you change the location of the STOP EXTENSION, you must re-calibrate the HOME OFFSET. Once you’re satisfied with the location of the STOP EXTENSION, proceed to the next step, Calibrating the Home Offset.

Setting the HOME OFFSET

Diagram showing the Home Offset
Click to enlarge

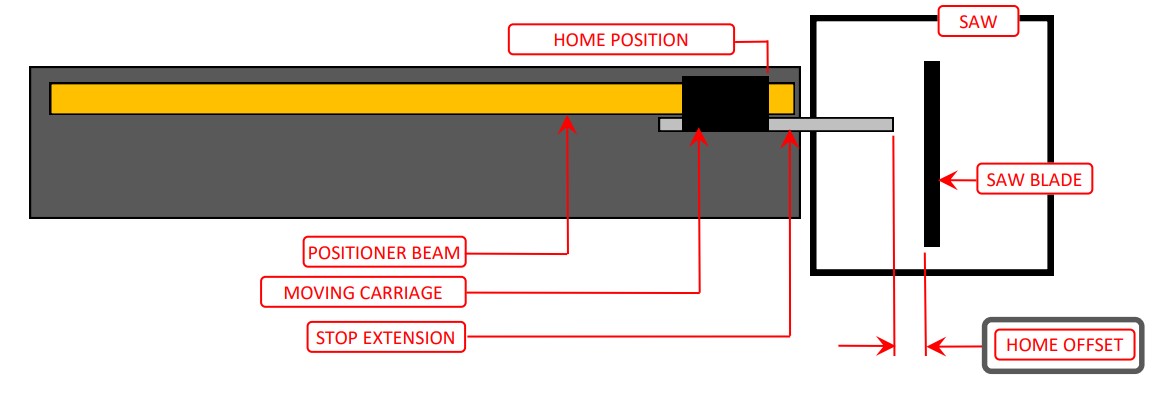
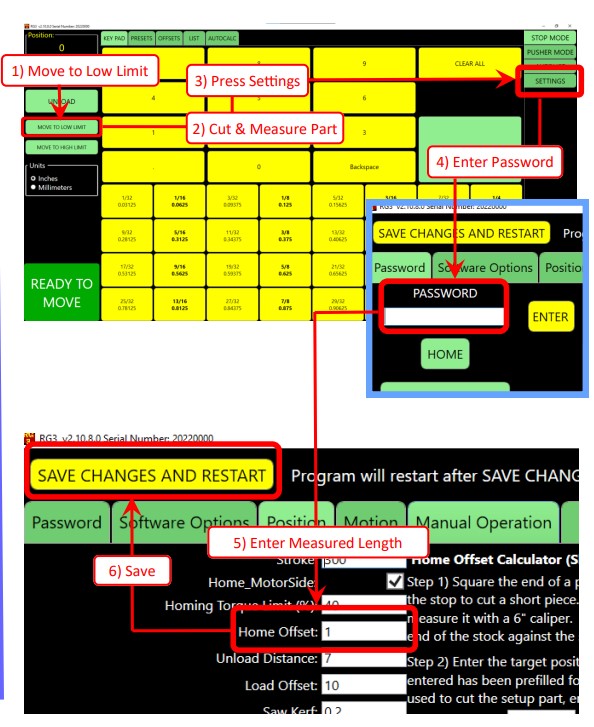
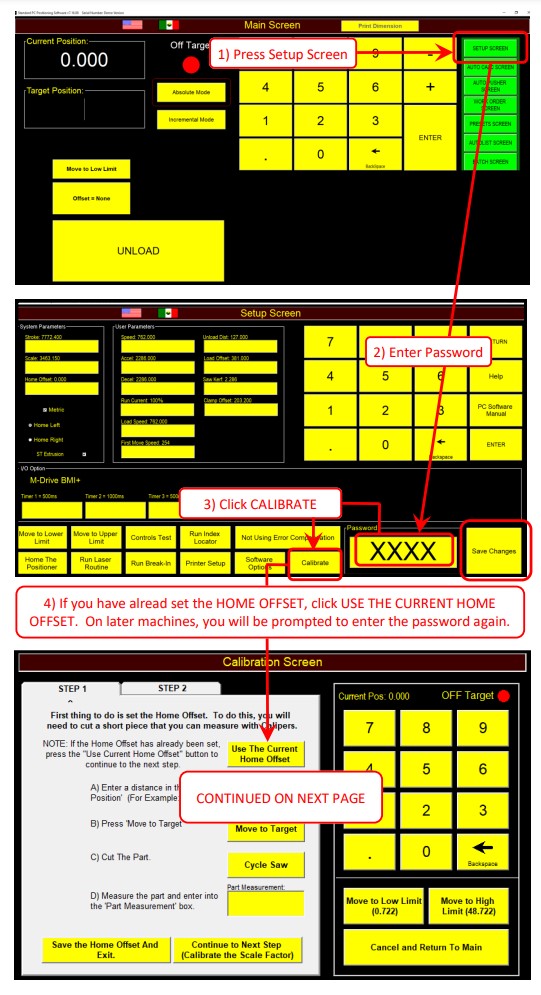
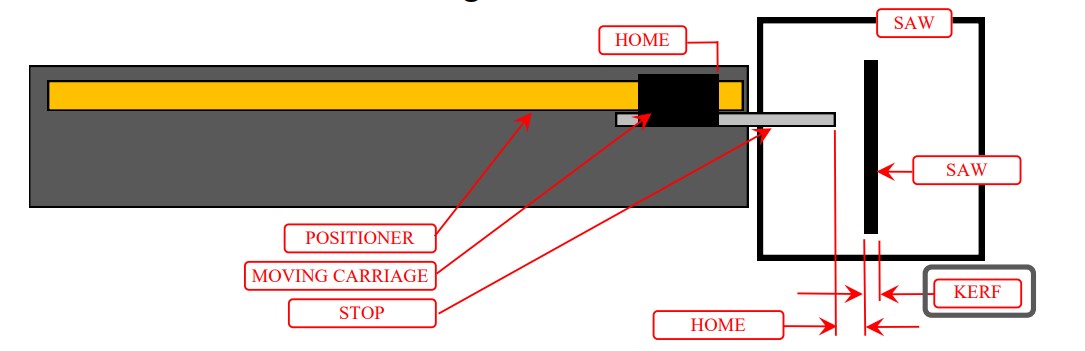
When the positioner is at HOME (LOW LIMIT), the software needs to know where the saw blade is relative to the end of the stop extension. We call that distance the HOME OFFSET.

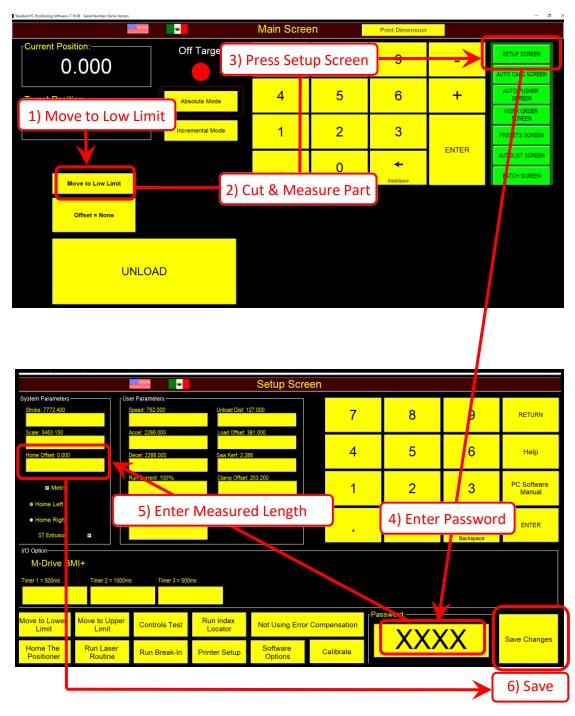
To determine the HOME OFFSET, square the end of a piece of stock, press the LOW LIMIT button in the RazorGage software, place the square end of the stock against the RazorGage stop, and cycle the saw. Measure the resulting part and enter its length as the HOME OFFSET

RGST Screens

1 - Move to Low Limit. 2 - Cut & Measure Part. 3 - Press Setup Screen. 4 - Enter Password. 5 - Enter Measured Length. 6 - Save
Click to enlarge

RG3 Screns

1 - Move to Low Limit. 2 - Cut & Measure Part. 3 - Press Settings. 4 - Enter Password. 5 - Enter Measured Length. 6 - Save
Click to enlarge

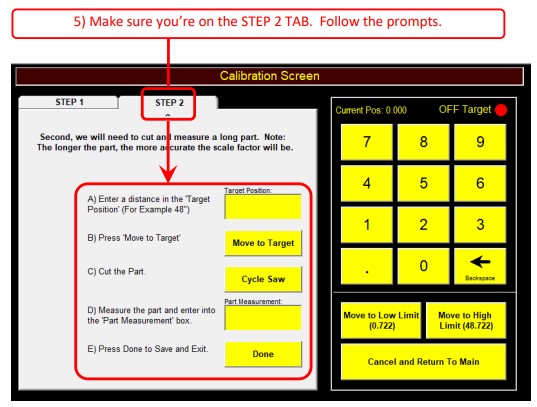
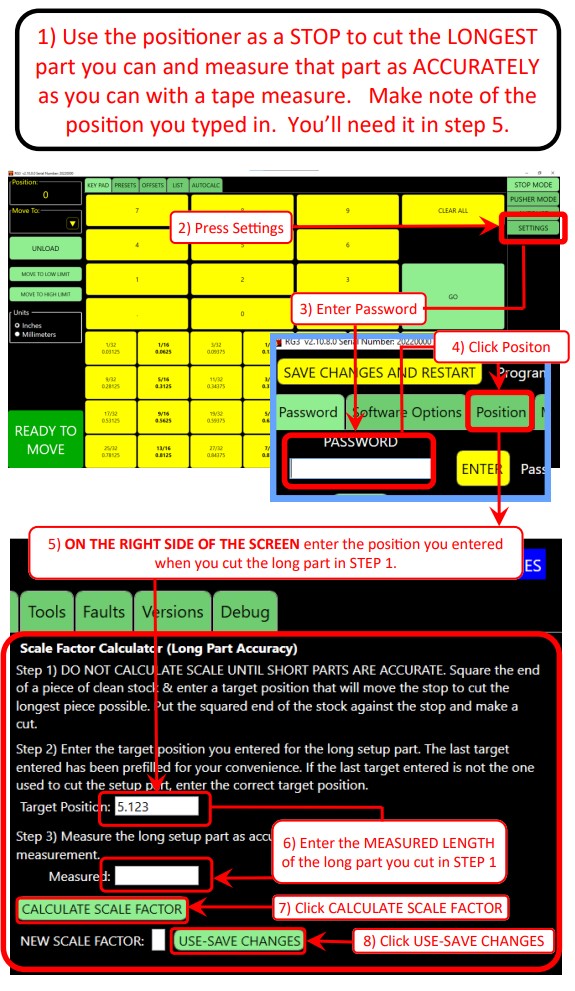
Setting the SCALE FACTOR

Once the HOME OFFSET is defined correctly, short parts will be accurate. To make sure long parts are accurate, we calibrate the SCALE FACTOR. The SCALE FACTOR represents the number of motor counts per inch of travel. Let’s say that the current scale factor is 5000. That means that the motion controller is going to assume that if it turns the motor until 5000 counts ARE returned, the carriage has moved 1 inch. If the SCALE FACTOR is off by an amount that results in a .001” error, then a one inch part will only be off by .001”, a 2 inch part will be off by .002”, and a 100 inch part will be off by .100”. To set the SCALE FACTOR, cut and measure the longest part you can. That’s why SCALE FACTOR error results in increasing inaccuracy as you cut longer and longer parts. Follow the steps below to set the SCALE FACTOR.

RGST Screens

1 - Press Setup Screen. 3 - Click Calibrate. 4 - If you have already set the Home Offset, click Use the Current Home Offset. On later machines, you will be prompted to enter the password.5 - Make sure you're on the Step 2 Tab. Follow the Prompts.
Click to enlarge

RG3 Screns

1 - Use the positioner as a STOP to cut the LONGEST part you can measure that part as ACCURATELY as you can. 2 - Press Settings. 3- Enter Password. 4 - Click Position. 5- On the Right side of the screen, enter the position. 6 - Enter the MEASURED LENGTH of the long part you cut. 7 - Click Calculate Scale Factor. 8 - Click Use-Save Changes
Click to enlarge

Setting the KERF

Diagram showing where the KERF is
Click to enlarge
If you are using your RazorGage as a STOP ONLY, you are finished with calibration. If you plan to use the RazorGage as a PUSHER, you’ll need to set the kerf. The KERF is the material that is removed by the saw blade. When the RazorGage is pushing material, the finished part is produced on the side of the blade opposite the pusher itself. Therefore, when advancing a stick to cut a 10 inch part, the pusher must move 10 inches plus the thickness of the blade so that there is 10 inches of length on the side of the blade opposite the pusher after the saw cycles. There are a few ways to identify the kerf. My favorite is so simply create a cut list full of 5 inch parts and run a few using one of the RazorGage pusher screens. All the parts should be the same length. They may not be the right length, but they should all be the same. Adjust the kerf value to make them not only be the same length, but the correct length.

Explore Our Products and Accessories

Manufactured in Ames, Iowa, the RazorGage product line is based around our machine tool grade RazorGage ST Automatic Saw Measuring System and our revolutionary Cyclone 600 upcut saw. Our product line also includes optimizing saw systems with crayon defecting, and can include pocket hole drilling and scribe marking for face frame joinery. Our product line is designed to bring maximum efficiency to your operation.

RazorGage also offers a range of accessories to pair with and enhance the performance of your automatic saw measuring system. Each of which can be used with RazorGage saws and saw systems or other saws. Explore these accessories for customizing your saw station!

Learn More About RazorGage Products

View our product support or contact us to see how else RazorGage can help your business. We would be happy to discuss your needs and determine how you can grow your efficiency and operation with RazorGage.

Interested in Learning More about our products?

Interested in Learning More about our products?